Docker Networking Explained With Example
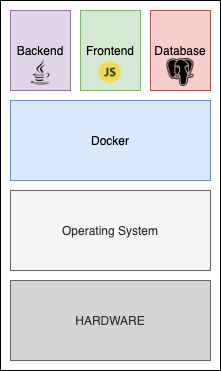
Most of our applications in production are multi-container applications. In a multi-container application, two or more containers work together as one to create a properly functioning application.
Imagine a web application with a backend, frontend, and database components that are all dockerized and work together to bring the web application to life! But how does the communication between these containers work?
This post explains how multiple containers on a single host communicate with each other to form a properly functioning application. The term container networking is examined on a Spring Boot application that uses Redis as the data store.
Please check out GitHub for the source code.
Container Networking
By default, containers are isolated from each other by any means. But when it comes to communication, there’s a simple rule to that:
If two containers are on the same network, they can talk to each other. If they are not on the same network, then they can not talk to each other.
When we run docker network ls we get a similar response to the following:
NETWORK ID     NAME      DRIVER    SCOPE
878992be35ab   bridge    bridge    local
67416f902106   host      host      local
141ad47583f3   none      null      local
When we compose our application and then check with the same command, we will see an additional line in the response:
NETWORK ID     NAME                   DRIVER    SCOPE
878992be35ab   bridge                 bridge    local
67416f902106   host                   host      local
141ad47583f3   none                   null      local
fccef87cd248   spring-redis_default   bridge    local
When we get our application up and running, we also created a separate network for our containers to communicate through. But how do we that?
Docker Compose Networking
There are different ways to create a network for our containers to use. In our example, we use docker-compose to build and run our containers. When we call docker-compose up to start up our application, docker-compose creates a network, creates containers, and adds them to the network for services defined in docker-compose.yml.
version: "3.9"
services:
    web:
        build: ./springboot
        ports:
            - "8888:8080"
    containerizedredis:
        build: ./redis
        image: "redis:alpine"
        ports:
            - "16378:16379"
When we run docker-compose up providing the above configuration, what compose does is:
- Create a new network and give it a default name (
spring-redis_default) - As my “web” service, create a container using the configuration at ./springboot and add it to the network
- As my “containerizedredis” service, create a container using the configuration at ./redis and add it to the network
The network name is set based on the directory name of your application. For example:
spring-redisis the name of my directory and the network is calledspring-redis_deafult.
Inspecting the Network
When our application is up and running, we can inspect the network to see that our containers have joined the network. To do so we are going to use the docker network inspect spring-redis_default command.
"Containers": {
    "ec23f91b6ab55e202080da5b62d8cf4c44f60001aebc618a410d279d915c674d": {
        "Name": "spring-redis_web_1",
        "EndpointID": "ba1753bcbdda6bbfda126b99223f2690155e0f80a7c57df53c5c04857f9e03c0",
        "MacAddress": "02:42:ac:12:00:02",
        "IPv4Address": "172.18.0.2/16",
        "IPv6Address": ""
    },
    "f02034324ffeaf8f4483265a3c0663e24f3982835512d4a5cf6c56e523ad6e4b": {
        "Name": "spring-redis_containerizedredis_1",
        "EndpointID": "1d148a1d0889a863e4cf506ea985c1149df6e7ba2f0fedba4a4607565067aea7",
        "MacAddress": "02:42:ac:12:00:03",
        "IPv4Address": "172.18.0.3/16",
        "IPv6Address": ""
    }
},
What we are looking for in the output is the Containers section. Here we can see that both of our containers (for redis and spring-boot) are joined to the network and now are able to communicate with each other!
Bridge Network
By default, a network called Docker Bridge Network is created, and all the containers are connected to that network if any other network is specified. Each container gets an internal IP address, and now all containers in that bridge can speak to one another. This provides an isolated network to the containers that live in a single host.
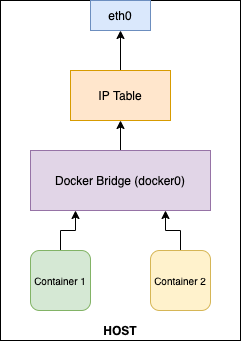
There are other network drivers such as Host and Overlay. By default, docker-compose creates a bridge network if any other driver is specified. Having a user-defined bridge network is better for isolation since all new containers are bound automatically when created without a “–network” flag.
Discoverability of Containers
In our case, our Spring Boot and Redis containers talk to each other to exchange information. They are already in the same network and have their IP addresses but, our Spring Boot Application is not using a static IP address to reach to Redis container but instead, it uses a hostname containerizedredis. Containers, like all other machines, use IP addresses at the end to communicate over the internet. The name “containerizedredis” is resolved to an IP address thanks to an A record created for it. We can examine the record with the help of another container that includes lots of useful debugging tools called nicolaka/netshoot. We will assign it to our new network “spring-redis_default” and run the container in interactive mode.
docker run -it --network spring-redis_default nicolaka/netshoot
Now let’s check out the record with the name containerizedredis:
$ dig containerizedredis

; <<>> DiG 9.16.11 <<>> containerizedredis
;; global options: +cmd
;; Got answer:
;; ->>HEADER<<- opcode: QUERY, status: NOERROR, id: 62165
;; flags: qr rd ra; QUERY: 1, ANSWER: 1, AUTHORITY: 0, ADDITIONAL: 0

;; QUESTION SECTION:
;containerizedredis.		IN	A

;; ANSWER SECTION:
containerizedredis.	600	IN	A	172.18.0.3

;; Query time: 0 msec
;; SERVER: 127.0.0.11#53(127.0.0.11)
;; WHEN: Sat Mar 06 10:20:39 UTC 2021
;; MSG SIZE  rcvd: 70
We can see in the response that there’s an A record for containerizedredis and it is resolved to an IP address 172.18.0.3. This means that whenever our Spring Boot application tries to access the host containerizedredis it is directed to 172,18.0.3.
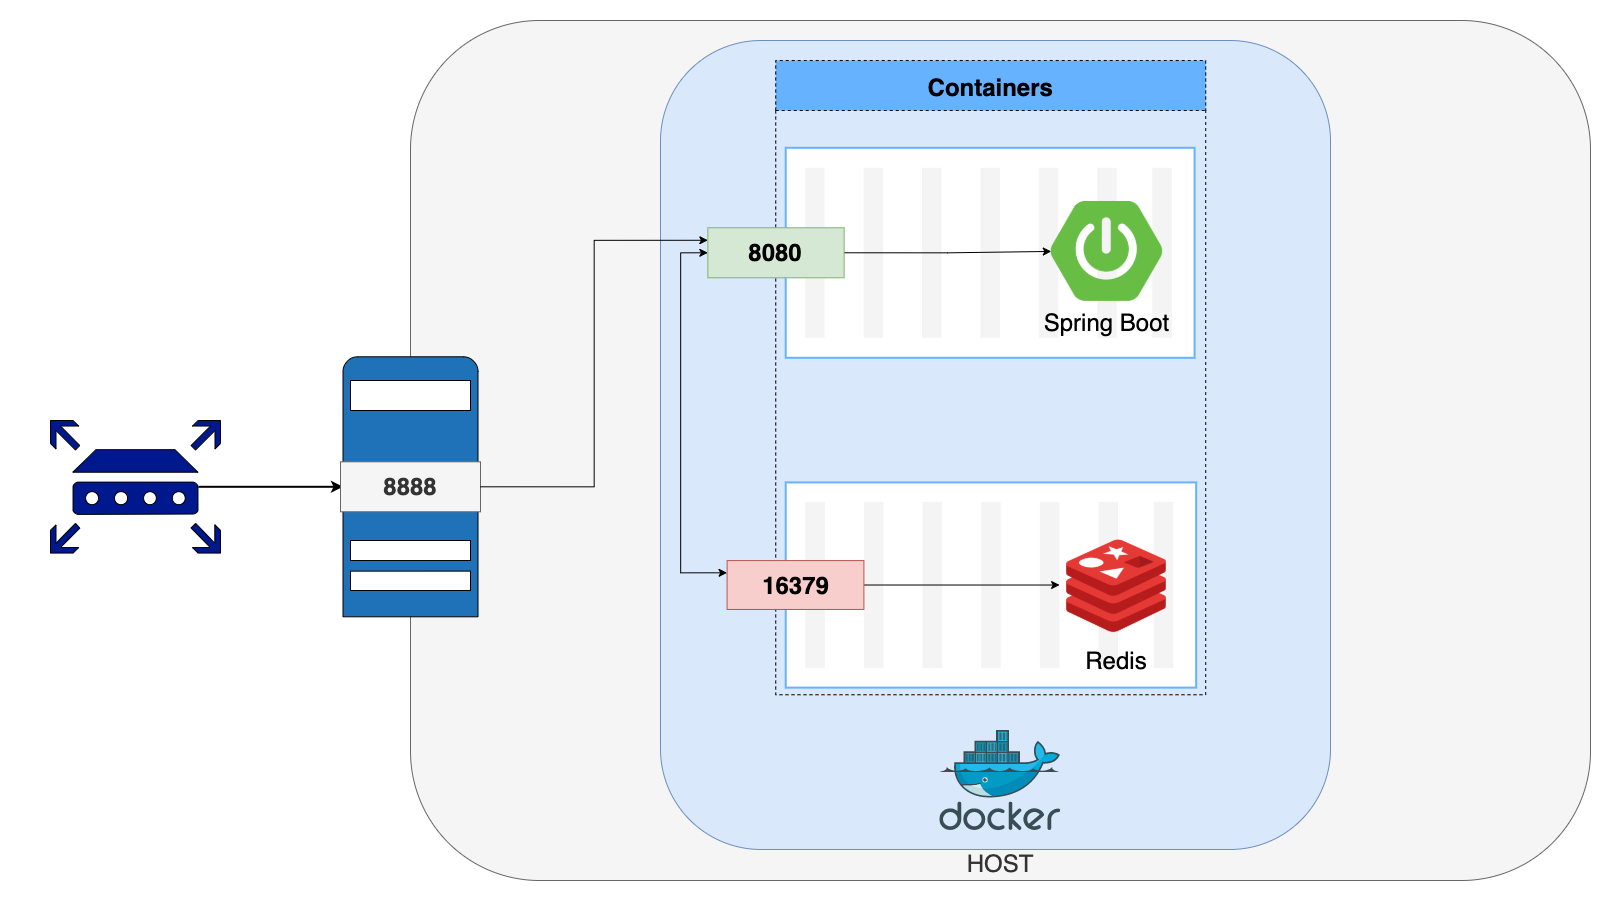
Exposing Ports
Exposing the ports is not needed for the container to container communication. Exposing a port of a container means that the port is open to anyone as long as the host allows. Now that our containers can communicate with each other in an isolated environment, finally, it is time we talk to them.
In Docker Compose files, we define ports we want to expose with the following format: “HOST_PORT:CONTAINER_PORT”.
HOST_PORTis used when we want to specify which port to use to access the container from the host.CONTAINER_PORTis used for container-to-container communication between services.
For example in our docker-compose.yml file, we set our ports as follows:
version: "3.9"
services:
    web:
        build: ./springboot
        ports:
            - "8888:8080"
    containerizedredis:
        build: ./redis
        image: "redis:alpine"
        ports:
            - "16379"
Here what we say is that:
- Let the containers created with
webservice configuration communicate with other containers in the same network over its8080port, and let anyone reach out to these containers from the host’s8888port. - Let the containers created with
containerizedredisservice configuration communicate with other containers in the same network over its16379port, and it is not important which host port is assigned for outside communication.
So when we run docker ps what we see should be similar to what we have here:
CONTAINER ID   IMAGE              COMMAND                  CREATED          STATUS          PORTS                                NAMES
8f5b4ce0bf18   spring-redis_web   "java -jar /app.jar"     18 minutes ago   Up 18 minutes   0.0.0.0:8888->8080/tcp               spring-redis_web_1
804581c50507   redis:alpine       "docker-entrypoint.s…"   18 minutes ago   Up 18 minutes   6379/tcp, 0.0.0.0:55000->16379/tcp   spring-redis_containerizedredis_1
For spring-redis_web_1, port 8080 is exposed, and 0.0.0.0:8888 on the host machine accepts the requests and delivers them to the container.
For spring-redis_containerizedredis_1, port 1679 is exposed and 55000 is given arbitrarily to deliver requests to that port on the host machine to the container.
You may ask why the port
6379is listed to be exposed for redis container, even though we have not done it ourselves, it is because the redis:alpine image we use to build our container has theEXPOSE 6379line in its Dockerfile.
Show Time!
Apparently, the encoding of Java’s UUID on the redis-server side was a bit weird, but you get the idea.
References
https://docs.docker.com/network/ https://docs.docker.com/compose/networking/ https://www.youtube.com/watch?v=PpyPa92r44s https://www.youtube.com/watch?v=Yr6-2ddhLVo